
VS Codeで AWS Toolkit を使って Lambda 関数をローカルでテストする方法 (AWS SAM)
Created at:AWS の Lambda 関数をローカルでテストする方法を調べてみました。その中で、VS Code の拡張機能である AWS Toolkit を利用する方法を試してみたので紹介したいと思います。
内容
- AWS Toolkit (VS Code) の設定
- SAM アプリケーションの作成
- Lambda 関数のローカル実行
- ローカル デバッグ
- 単体テストについて
事前準備
- AWS CLI のインストール:
- aws コマンドが使えるようになります。
- AWS SAM CLI のインストール:
- sam コマンドが使えるようになります。
- Docker のインストール:
- VS Code に追加した AWS Toolkit で Lambda 関数を 実行するときに、Docker 環境が立ち上がります。
AWS Toolkit (VS Code) の設定
インストール
(2020 年 4 月 22 日時点) 最新の AWS Toolkit 1.8 には問題が多く、うまく動作しなかったので AWS Toolkit 1.7 をインストールしました。前回のブログ記事でインストール手順を説明しています。
認証情報の設定
インストール後、「Ctrl」 + 「Shift」 + 「P」 でコマンドパレットを表示させます。AWS: Create Credentials Plofile を実行してユーザーの認証情報を設定します。
- aws_access_key_id = 各自のアクセスキー ID
- aws_secret_access_key = 各自のシークレットアクセスキー
- region = ap-northeast-1
- output = json
AWS へ接続
左端のアクティビティ バーの AWS アイコンをクリックし、その他の操作から Connect to AWS を選びます。
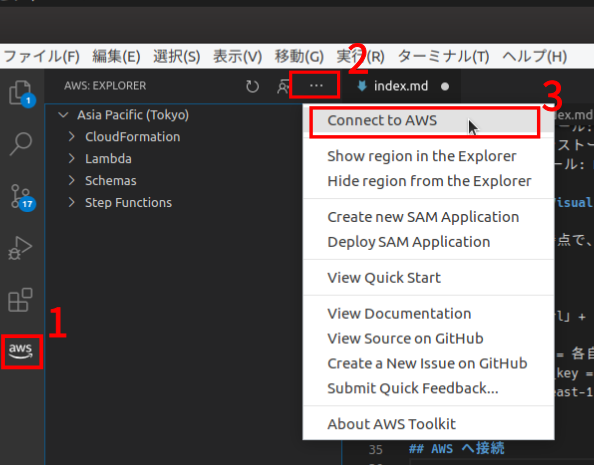
Select an AWS credential profile と出るのでユーザーを選びます。

SAM アプリケーションの作成
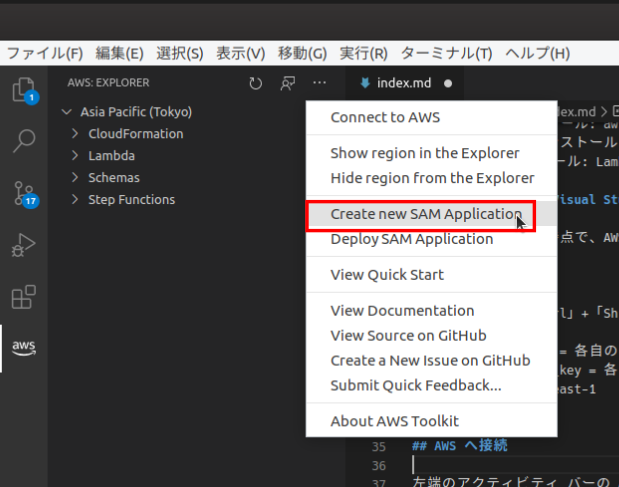
その他の操作から Create new SAM Application を選択します。
Runtime 言語を聞かれるので、使用する言語を選択します。

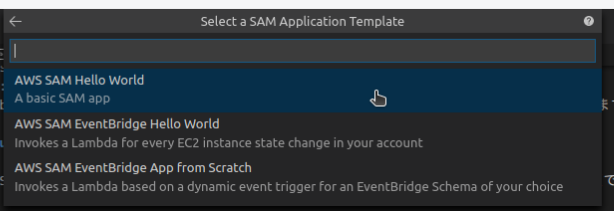
Select a SAM Application Template と表示されるので、SAM アプリケーションのテンプレートを選択します。今回は AWS SAM Hello World のテンプレートを選択しました。
プロジェクトフォルダを追加するワークスペースを選択します。
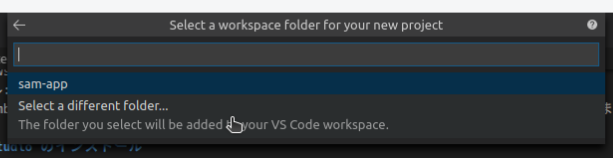
アプリケーション名をつけて [Enter] を押します。

SAM アプリケーションの作成が完了し、template.yaml が開きます。
AWSTemplateFormatVersion: '2010-09-09'
Transform: AWS::Serverless-2016-10-31
Description: >
  samp-app

  Sample SAM Template for samp-app

# More info about Globals: https://github.com/awslabs/serverless-application-model/blob/master/docs/globals.rst
Globals:
  Function:
    Timeout: 3

Resources:
  HelloWorldFunction:
    Type: AWS::Serverless::Function # More info about Function Resource: https://github.com/awslabs/serverless-application-model/blob/master/versions/2016-10-31.md#awsserverlessfunction
    Properties:
      CodeUri: hello_world/
      Handler: app.lambda_handler
      Runtime: python3.7
      Events:
        HelloWorld:
          Type: Api # More info about API Event Source: https://github.com/awslabs/serverless-application-model/blob/master/versions/2016-10-31.md#api
          Properties:
            Path: /hello
            Method: get

Outputs:
  # ServerlessRestApi is an implicit API created out of Events key under Serverless::Function
  # Find out more about other implicit resources you can reference within SAM
  # https://github.com/awslabs/serverless-application-model/blob/master/docs/internals/generated_resources.rst#api
  HelloWorldApi:
    Description: "API Gateway endpoint URL for Prod stage for Hello World function"
    Value: !Sub "https://${ServerlessRestApi}.execute-api.${AWS::Region}.amazonaws.com/Prod/hello/"
  HelloWorldFunction:
    Description: "Hello World Lambda Function ARN"
    Value: !GetAtt HelloWorldFunction.Arn
  HelloWorldFunctionIamRole:
    Description: "Implicit IAM Role created for Hello World function"
    Value: !GetAtt HelloWorldFunctionRole.Arn
まずは、Resources に着目します。ここでは HelloWorrldFunction を定義し、関数の場所 (CodeUri) や実行方法 (Runtime) が記述されています。また、HelloWorld イベントが指定されています。
Outputs に着目すると、テンプレートからの出力が記述されていることがわかります。API ゲートウェイエンドポイント、Lambda 関数の ARN 、関数の IAM ロールです。これらはクラウド上で使う値のため、ローカル実行には影響ありません。
プロジェクトフォルダの構造
生成されたプロジェクトフォルダの構造は次のようになります。
samp-app/template.yaml が先ほど説明したテンプレートファイルです。
samp-app/hello_world/app.py が後述する Lambda 関数となります。
sam-app
├── README.md
├── events
│   └── event.json
├── hello_world
│   ├── __init__.py
│   ├── app.py
│   └── requirements.txt
├── template.yaml
└── tests
    └── unit
        ├── __init__.py
        └── test_handler.py
Lambda 関数をローカル実行
今回実行するのは次のソースコードです。
import json

def lambda_handler(event, context):
    return {
        "statusCode": 200,
        "body": json.dumps({
            "message": "hello world",
        }),
    }
app.py を開くと、def lambda_handler(event, context): の上部に Run Locally | Debug Locally | Configure が表示されます。

Run Locally をクリックすると、SAM アプリケーションの build を開始し、build 完了後に Docker 環境を使ってローカルで関数が実行されます。
出力画面に次の内容が表示されると成功です。もし不具合があればエラー内容が表示されます。下から 2 行目の {"statusCode":200,"body":"{\"message\": \"hello world\"}"} が return で返されたメッセージです。
Preparing to run app.lambda_handler locally...
Building SAM Application...
Build complete.
Starting the SAM Application locally (see Terminal for output)
Running command: sam local invoke awsToolkitSamLocalResource --template /tmp/aws-toolkit-vscode/vsctkWJRC7M/output/template.yaml --event /tmp/aws-toolkit-vscode/vsctkWJRC7M/event.json --env-vars /tmp/aws-toolkit-vscode/vsctkWJRC7M/env-vars.json
Invoking app.lambda_handler (python3.7)

Fetching lambci/lambda:python3.7 Docker container image......
Mounting /tmp/aws-toolkit-vscode/vsctkWJRC7M/output/awsToolkitSamLocalResource as /var/task:ro,delegated inside runtime container
START RequestId: e6be9048-5361-1a95-7f68-46eac053e80d Version: $LATEST
END RequestId: e6be9048-5361-1a95-7f68-46eac053e80d
REPORT RequestId: e6be9048-5361-1a95-7f68-46eac053e80d	Init Duration: 496.14 ms	Duration: 5.13 ms	Billed Duration: 100 ms	Memory Size: 128 MB	Max Memory Used: 24 MB

{"statusCode":200,"body":"{\"message\": \"hello world\"}"}
Local invoke of SAM Application has ended.
なお、テストイベントに body を追加したい場合は、def lambda_handler(event, context): の上部に表紙されている Configure をクリックします。 .aws/templates.json が開くので、空の event に要素を追加すれば渡されます。
{
    "templates": {
        "samp-app/template.yaml": {
            "handlers": {
                "app.lambda_handler": {
                    "event": {},
                    "environmentVariables": {}
                }
            }
        }
    }
}
AWS Lambda はこのパラメータを使用してイベントデータをハンドラーに渡します。このパラメータは通常、Python の dict タイプです。使用できるのは、list、str、int、float、または NoneType タイプです。AWS のサービスで関数を呼び出す場合、Lambda と統合する他のサービスから JSON の関数にイベントとしてデータが送信されます。詳細は AWS の開発者ガイドを確認してください。
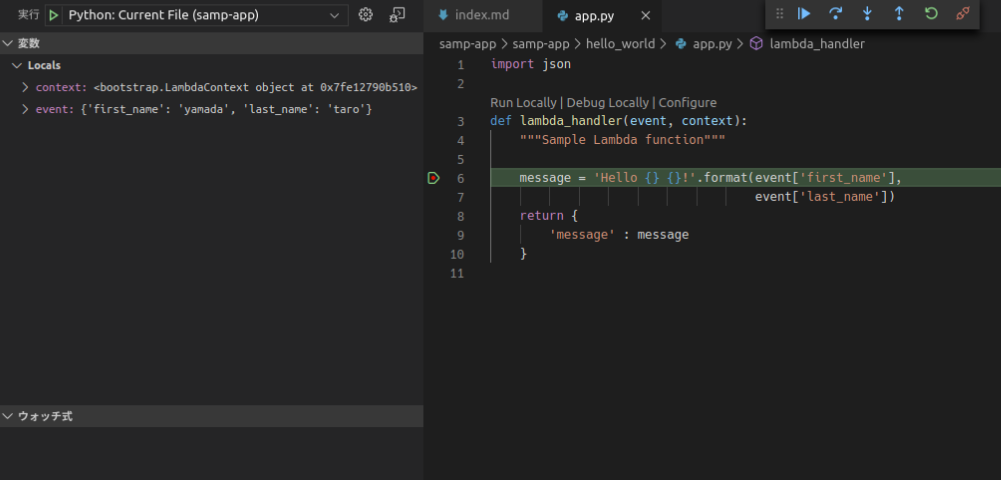
テストイベントからのデータ受け渡し
テストのときに event からデータを渡すように Lambda 関数を変更したいと思います。app.py の lambda_handler の中身を次のように変更して、テストイベントから受け取ったデータを含む message を返したいと思います。
def lambda_handler(event, context):
    message = 'Hello {} {}!'.format(event['first_name'],
                                    event['last_name'])
    return {
        'message' : message
    }
templates.json は event の中を次のように変更して、“first_name” と “last_name” のデータを渡します。
{
    "templates": {
        "samp-app/template.yaml": {
            "handlers": {
                "app.lambda_handler": {
                    "event": {
                        "first_name": "yamada","last_name": "taro"
                    },
                    "environmentVariables": {}
                }
            }
        }
    }
}
出力画面に次のように表示されます。下から 2 行目にテストイベントから渡されたデータを含むメッセージ {"message":"Hello yamada taro!"} が表示されています。
Preparing to run app.lambda_handler locally...
Building SAM Application...
Build complete.
Starting the SAM Application locally (see Terminal for output)
Running command: sam local invoke awsToolkitSamLocalResource --template /tmp/aws-toolkit-vscode/vsctk27L9bM/output/template.yaml --event /tmp/aws-toolkit-vscode/vsctk27L9bM/event.json --env-vars /tmp/aws-toolkit-vscode/vsctk27L9bM/env-vars.json
Invoking app.lambda_handler (python3.7)

Fetching lambci/lambda:python3.7 Docker container image......
Mounting /tmp/aws-toolkit-vscode/vsctk27L9bM/output/awsToolkitSamLocalResource as /var/task:ro,delegated inside runtime container
START RequestId: baec6f5f-fe08-1764-03f0-57a70d3a2531 Version: $LATEST
END RequestId: baec6f5f-fe08-1764-03f0-57a70d3a2531
REPORT RequestId: baec6f5f-fe08-1764-03f0-57a70d3a2531	Init Duration: 509.26 ms	Duration: 5.08 ms	Billed Duration: 100 ms	Memory Size: 128 MB	Max Memory Used: 24 MB

{"message":"Hello yamada taro!"}
Local invoke of SAM Application has ended.
ローカル デバッグ
Debug Locally をクリックすると、Lambda 関数を VS Code 上でデバッグできます。
app.py 上でブレークポイントを設定してデバッグを開始します。
設定したブレークポイントで止まります。[F5] キーを押して続行すると処理が完了します。
VS Code 上で Lambda 関数を構築してデバッグすることができました。
単体テスト
Python での単体テストは pytest をインストールして行います。
単体テストのテストコードをプロジェクトフォルダの tests フォルダにある test_handler.py ファイルに書いて、pytest コマンドでテストを実行します。
pytest コマンドで test_ から始まる名前の関数が実行されます。今回実行するテストコードを次に示します。
def test_lambda_handler(apigw_event, mocker):

    ret = app.lambda_handler(apigw_event, "")
    assert ret["message"] == "Hello yamada taro!"
引数の apigw_event は単体テストで使う API Gateway のイベントです。
このように、テスト関数に必要な引数は pytest の fixture 機能を使います。関数の上に @pytest.fixture() と記述することで、その関数は fixture 関数となります。fixture 関数はテストの前処理として実行されます。
@pytest.fixture()
def apigw_event():
    """ Generates API GW Event"""

    return {
        "first_name": "yamada",
        "last_name": "taro",
    }
テストコードの準備ができたので、 pytest を実行します。
$ pip install pytest pytest-mock --user
$ python -m pytest tests/ -v
実行結果は次のようになります。単体テストは成功しました。
========================================================================================= test session starts =========================================================================================
platform linux -- Python 3.7.7, pytest-5.4.1, py-1.8.1, pluggy-0.13.1 -- /home/linuxbrew/.linuxbrew/opt/python/bin/python3.7
cachedir: .pytest_cache
rootdir: /home/daiki/work/samp-app/samp-app
plugins: mock-3.1.0
collected 1 item

tests/unit/test_handler.py::test_lambda_handler PASSED                                                                                                                                          [100%]

========================================================================================== 1 passed in 0.03s ==========================================================================================
参考文献
- チュートリアル: Hello World アプリケーションのデプロイ - AWS サーバーレスアプリケーションモデル
- AWS Serverless Application Model (SAM) コマンドラインインターフェイス。サーバレスアプリケーションをローカルで構築、テスト、デバッグする | Amazon Web Services ブログ
- サーバーレスアプリケーションのテストとデバッグ - AWS サーバーレスアプリケーションモデル
- AWS Lambda をローカルで使用できるようにしてみる。 - なんとなくのブログ
- AWS SAM CLI を使って、ローカルでLambda環境を構築する - Qiita
- [AWS SAM]VSCodeでLambda関数をローカルで開発する - Qiita
- pytest:フィクスチャ(fixture)の使い方 - Qiita